
Pelmeni / Пельмени
Originally popular in Siberia, pelmeni spread all across Russia and its neighbouring countires and they are still a favourite dish for many people. In modern Russia and Ukraine pelmeni are commonly made at home and can be bought in stores. The store-bought variety is considered to be a fast food and is associated with students’ or bachelors’ lifestyles.
Pelmeni come from the family of dumplings, and are cousins to Ukrainian varenyky and Polish pierogi. There are 3 important differences between pelmeni and varenyky:
- The size – a typical pelmen’ (singular) is about 2 to 3 cm in diameter, varenyky are often twice that size.
- The dough – as thin as possible, with a higher proportion of filling to dough
- The filling – always raw meat (varenyky filling is typically precooked), and never made with anything sweet (varenyky could be made with cherries, sour cherries, sweet cottage cheese, blueberries, etc.)
Russian people are somewhat obsessed with their pelmeni, same as Ukrainians are obsessed with their varenyky, and each family has their own recipe and preparation method. Pelmeni could be a royal pain in the you-know-where to make 🙂 During my recent trip back home my aunt gave me her old pelmeni mold (pelmennitsa / пельменница) – it speeds up the process tremendously! Enlist some help if making pelmeni by hand – I am a great believer in child labour in kitchen 🙂

Pelmeni Mold / Пельменница
Yields about 65
Pelmeni filling
- ½ lb ground beef
- ½ lb ground pork
- 1 small onion
- 1 tsp salt
- ½ tsp freshly ground black pepper
Method:
- Finely grate the onion or chop it into very small pieces in a food processor.
- Add it to the ground meat along with salt and pepper and mix everything very well;
- Use any leftover filling to make meatballs, chili, or meatloaves.
Note: 50/50 mixture of beef and pork is traditional; you can also try lamb, chicken, or turkey or any combination you may like.
The dough – click here
Toppings:
- Butter, vinegar, sour cream – my favourite combination
- Chopped dill, chopped green onions, ketchup
Instructions:
If using a pelmeni mold:
1. Roll out a chunck of dough into a circle.
2. Place over mold. Place 1/2 tsp meat into each pocket space on the mold.

Making pelmeni in the pelmennitsa
3. Roll out another chunk of dough and place over the mold.
4. Use a rolling pin, roll the top, working from the center – outwards
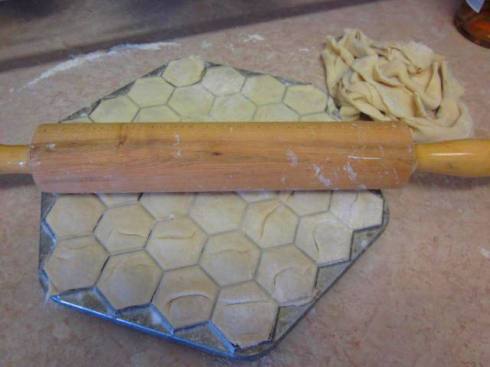
Making pelmeni in the pelmennitsa
5. Turn the pelmeni maker over and push the pelmeni out onto a well-floured cookie tray. I used some waxed paper to invert pelmeni on.
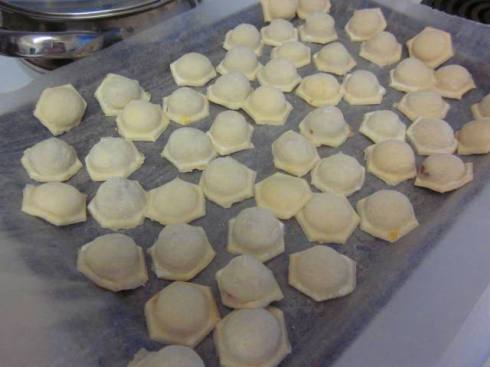
Ready to boil or to freeze
6. Arrange evenly, sprinkle with flour and place the tray in the freezer.
7. Once pelmeni are fully frozen, put them in large plactic or ziploc bags, and keep them in the freezer for future meals.
If making pelmeni by hand:
- Roll out dough, cut out small circles by using a tall shot glass or the smallest round cookie cutter
- Place meat in the middle, and seal, by pinching the edges together.
- Connect the two edges together like so

Cooking Directions:
- Bring a large pot (to allow apmle floating space) of water to boil and add 1 tsp salt
- Add FROZEN pelmeni and return to a boil. After pelmeni float to the top, boil for another 3 mintues
- Drain pelmeni and place them in a clean bowl. Toss pelmeni with your favourite toppings and serve hot.
.
Tags: пельмени, пельменница, food, Pelmeni, pelmeni mold, pelmennitsa, Russian food


