Archive | Russian Food RSS feed for this section

Kompot / Компот

20 Aug
Kompot / Kомпот

Kompot / Kомпот

Kompot / Компот is a traditional drink in Eastern European countries and Russia.  It’s a dessert-like drink made from water, any edible fruits/berries and some sugar or honey (optional).   The sweet drink made from various dried fruits ( pears, apples, prunes and raisins) was known in Russia even before XVII century and is called uzvar.  Uzvar is a festive meal which still served on Christmas Eve.  It is also a staple drink in Ashkenazi Jewish cuisine.  Word Kompot / Компот came in Russian language from French compote.

Cold kompot is very refreshing and it is believed that it balances the effect of humidity on the body.  It can also be served hot during cold winter nights.   As a kid, I remember opening a jar of tart cherries kompot in December  and the aroma would transfer me right in the hot mid-summer 🙂

Kompots are the best way to preserve summer fruits and berries.  Jars sterilization ensures the safety of these preserves. Fruits and berries are not cooked for long and they are more likely to retain their natural flavour.

Red currants

Red currants

Ingredients (add more sugar if you prefer a sweeter drink and more berries for intensity): 

  • 4 cups water
  • 1 tbsp raw organic sugar
  • 1/2 pint red currants

Directions:

  1. Boil water and sugar, bring to a simmer and add currants.
  2. Turn the heat off after currants turn pale pink, about 2-3 minutes.
  3. Serve hot, chilled or cold – delicious!

Pelmeni (Пельмени), the Famous Russian Dumplings

12 Aug
Pelmeni / Пельмени

Pelmeni / Пельмени

Originally popular in Siberia, pelmeni spread all across Russia and its neighbouring countires and they are still a favourite dish for many people.  In modern Russia and Ukraine pelmeni are commonly made at home and can be bought in stores. The store-bought variety is considered to be a fast food and is associated with students’ or bachelors’ lifestyles.

Pelmeni come from the family of dumplings, and are cousins to Ukrainian varenyky and Polish pierogi. There are 3 important differences between pelmeni and varenyky:

  1. The size – a typical pelmen’ (singular) is about 2 to 3 cm in diameter, varenyky are often twice that size.
  2. The dough – as thin as possible,  with a higher proportion of filling to dough
  3. The filling –  always raw meat (varenyky filling is typically precooked), and never made with anything sweet (varenyky could be made with cherries, sour cherries, sweet cottage cheese, blueberries, etc.)

Russian people are somewhat obsessed with their pelmeni, same as Ukrainians are obsessed with their varenyky, and each family has their own recipe and preparation method. Pelmeni could be a royal pain in the you-know-where to make 🙂 During my recent trip back home my aunt gave me her old pelmeni mold (pelmennitsa / пельменница) – it speeds up the process tremendously!  Enlist some help if making pelmeni by hand – I am a great believer in child labour in kitchen 🙂

Pelmeni Mold / Пельменница

Pelmeni Mold / Пельменница

Yields about 65

Pelmeni filling

  • ½ lb ground beef
  • ½ lb ground pork
  • 1 small onion
  • 1 tsp salt
  • ½ tsp freshly ground black pepper

Method:

  1. Finely grate the onion or chop it into very small pieces in a food processor.
  2. Add it to the ground meat along with salt and pepper and mix everything very well;
  3. Use any leftover filling to make meatballs, chili, or meatloaves.

Note: 50/50 mixture of beef and pork is traditional; you can also try lamb, chicken, or turkey or any combination you may like.

The doughclick here

Toppings:

  • Butter, vinegar, sour cream – my favourite combination
  • Chopped dill, chopped green onions, ketchup

Instructions:

If using a pelmeni mold: 

1. Roll out a chunck of dough into a circle.
2. Place over mold. Place 1/2 tsp meat into each pocket space on the mold.

Making pelmeni in the pelmennitsa

Making pelmeni in the pelmennitsa

3. Roll out another chunk of dough and place over the mold.
4. Use a rolling pin, roll the top, working from the center – outwards
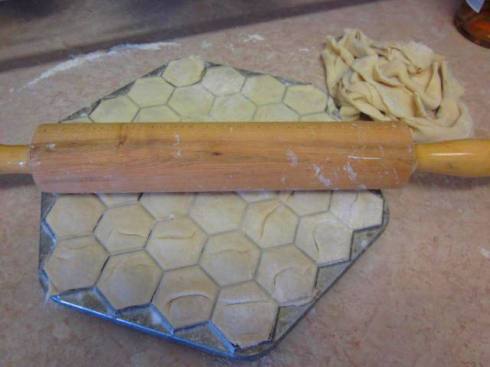
Making pelmeni in the pelmennitsa

Making pelmeni in the pelmennitsa

5. Turn the pelmeni maker over and push the pelmeni out onto a well-floured cookie tray.  I used some waxed paper to invert pelmeni on.
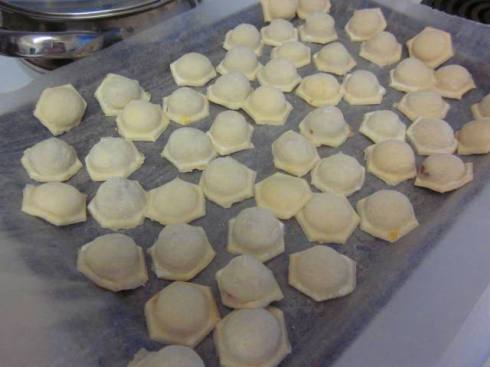
Ready to boil or to freeze

Ready to boil or to freeze

6. Arrange evenly, sprinkle with flour and place the tray in the freezer.
7. Once pelmeni are fully frozen, put them in large plactic or ziploc bags, and keep them in the freezer for future meals.

If making pelmeni by hand:

  1. Roll out dough, cut out small circles by using a tall shot glass or the smallest round cookie cutter
  2. Place meat in the middle, and seal, by pinching the edges together.
  3. Connect the two edges together like so

Making pelmeni by hand

Cooking Directions:

  1. Bring a large pot (to allow apmle floating space) of water to boil and add 1 tsp salt
  2. Add FROZEN pelmeni and return to a boil. After pelmeni float to the top, boil for another 3 mintues
  3. Drain pelmeni and place them in a clean bowl. Toss pelmeni with your favourite toppings and serve hot.

.

Ukrainian Green Borsch / Зелёный Борщ

9 Aug

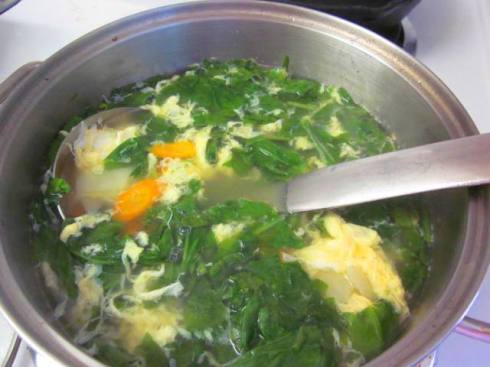
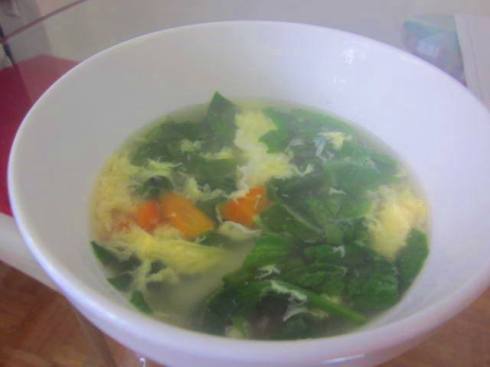
Ukrainian Green Borsch / Зелёный Борщ

Unlike its’ hearty cousin (red beet borsch ) with strong flavours that warm you up during cold winter days, this borsch is light and can be eaten hot or cold. It is known in all Eastern European cousins and sometimes also called Sorrel or Shchav Soup.

As with many other traditional recipes, there are endless variations of this borsch.  I am going to share the version made in my family.  I “eat with my eyes” first and 4 simple but colourful ingredients make this borsch very appetizing.

Still steaming!

Still steaming!

Green borsch is traditionally made from lemony sorrel.  I am yet to find sorrel in Toronto so I made it with spinach and some vinegar to re-create that light tangy flavor of sorrel.  You can substitute sorrel with any other leafy greens too (swiss chard, beet greens, etc).

TIP: Add your greens just before turning off the heat, or your borsch will be brown instead of bright emerald.

My dad liked this borsh garnished with roughly chopped hard-boiled egg; my mom preferred it in the manner of an egg drop soup where you gradually pour in beaten egg into the boiling liquid.  I equally like both versions.

To serve – do it as Ukrainians do: with sour cream and chopped dill.  I can’t think of anything that is served without either sour cream or dill or both 😀

Ingredients (Serves 2):

  • 1 large or 2 small carrots, cut any way you like (cubed, chopped, grated or sliced)
  • 1 large or 2 small potatoes, cut in cubes
  • 4 cups chicken stock or water
  • 3 cups sorrel or spinach, thick stems removed
  • 2-3 tsp vinegar
  • S & P to taste

Garnishes:

  • 1 egg (either hard-boiled or beaten), sour cream, chopped dill

Directions:

  1. Bring chicken stock or water to boil, add carrots and potatoes.
  2. Cook for 15 – 20 minutes or until tender, and season with salt and pepper to taste.
  3. Add your greens, vinegar and beaten egg (if using) and turn off the heat
  4. Garnish and serve hot or cold.

Old-Fashioned Russian Dill Pickles – No Canning

6 Aug

Homemade dill pickles

Homemade Dill Pickles / Домашние Малосольные Огурчики

This Russian classic recipe for малосольные огурчики (malosol’nuye ogurchiki) is a breeze to make and oh-so-tasty.  The combined smell of cucumbers, fresh dill, and garlic is taking me right back to my mom’s kitchen when I was helping to make these.  My job was to line up the jars on the counter and fill them with cucumbers.

One of my favourite summer dinners was a meal of pan-fried potatoes with malosol’nuye ogurchiki and fresh black bread (чёрный хлеб).

BTW, don’t throw out that pickle juice which is full of natural healing salts and minerals.  According to the popular Russian remedy it cures the worst hangover!
Ingredients:

  • cucumbers, whole or slices
  • 3-4 garlic cloves, sliced
  • 4 sprigs of fresh dill (ideally – the flowered heads if you can find them)
  • 1 tsp pickling spices (mixtures of coriander seeds, mustard seeds, crushed bay leaves & pepper flakes)
  • 10 whole black peppercorns
  • 4 cups water
  • 2 tbsp salt

Optional (to make your dill pickles crispy & extra flavourful):

  • Fresh grape, raspberry, black currant, or cherry leaves or 2-3 pieces fresh horse radish root.  I didn’t have any this time.

Directions:

  1. Bring water to a boil, add salt and let it simmer.
  2. Wash cucumbers in cold water and cut the ends off (about ¼ inch)
  3. Add pickling spice, peppercorn, bay leaves, 2 sprigs of dill and some garlic to a clean jar.
  4. Pack the cucumbers and pour the simmering water over and top it with the remaining dill sprigs. Leave about an inch of space between the water and the top of the jar
  5. Put a top on your jar and leave it on the counter.  Wait at least 24 hours; for best flavor – 1 week.
  6. Test a pickle on day 3. If it is to your liking, put the jar in the fridge to stop the fermentation process.
  7. They can keep in the fridge for up to 6 months.  Garlic may turn blue or green in the jar but don’t get  alarmed  –  it is only the effect of fermentation.